
Hardware Simulation
Your laptop stands in for the robot controller and drives the real motors. You start the program, pick Teleop, enable it, and press the buttons bound in your MyTeleop.
- The
mech-2-Commandsbranch checked out and building. - A bench checked in Tuner X, CANivore on this laptop: Hardware Setup and Motor Setup.
- An Xbox-style controller plugged into the same laptop.
What mechanism are you working on?
The lesson below is written for the one you pick. Switch back any time to read it for the other.
Hardware simulation stands in for the robot controller and nothing else. Every motor request leaves the laptop over USB, crosses the CANivore onto the CAN bus, and lands in the Kraken on your bench.
No part of this project models the arm, and nothing here works without powered motors.
Hand over the CAN bus
Two programs cannot own the CAN bus at once. Leave CANivore USB on and Tuner X keeps the bus, so your code reaches nothing.
Open Tuner X, open the CANivore settings, and turn CANivore USB off. Your devices drop off the Tuner X list, which is correct. It is the switch you turned on for bench testing, covered on Motor Setup.
Clear the bench before you enable
Enable the robot, hold a trigger, and a geared arm swings under 6 volts. Clear the path it travels. Check that nothing is clamped in the way, and keep a hand near Disable. If anything looks wrong, disable first and ask afterwards.
Run it
- In Tuner X, turn CANivore USB off and close the control window. You should see: your devices drop out of the Tuner X list.
- Plug the controller into the laptop. Check the mechanism is powered and its path clear.
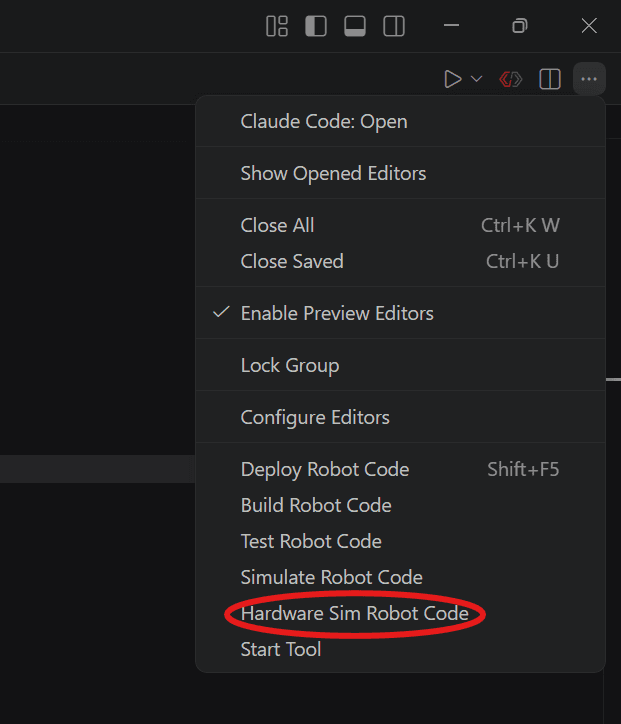
- Open the … menu at the end of the editor toolbar and choose Hardware Sim Robot Code. Not Simulate Robot Code, one line above it: that one fakes the hardware, and you want the real motors.
- A Pick extensions to run prompt appears. Leave Sim GUI ticked and press OK. You should see: a simulation window and
********** Robot program startup complete **********in the console. - Drag your controller out of System Joysticks and drop it on Joystick[0]. Your code reads
new CommandNiDsXboxController(0), so port 0 is the one it hears. Leave Map gamepad ticked.
![The simulation window, with an arrow from Xbox Controller in System Joysticks to Joystick[0] in the Joysticks panel](/_next/image?url=%2Fimages%2Frunning-program%2Fadd-controller.png&w=3840&q=75)
- In Robot State, pick Teleoperated, then choose your OpMode from the dropdown under it. You should see:
OpMode GOODbeside the dropdown, and********** Starting OpMode Teleop **********in the console. That print is your constructor running.
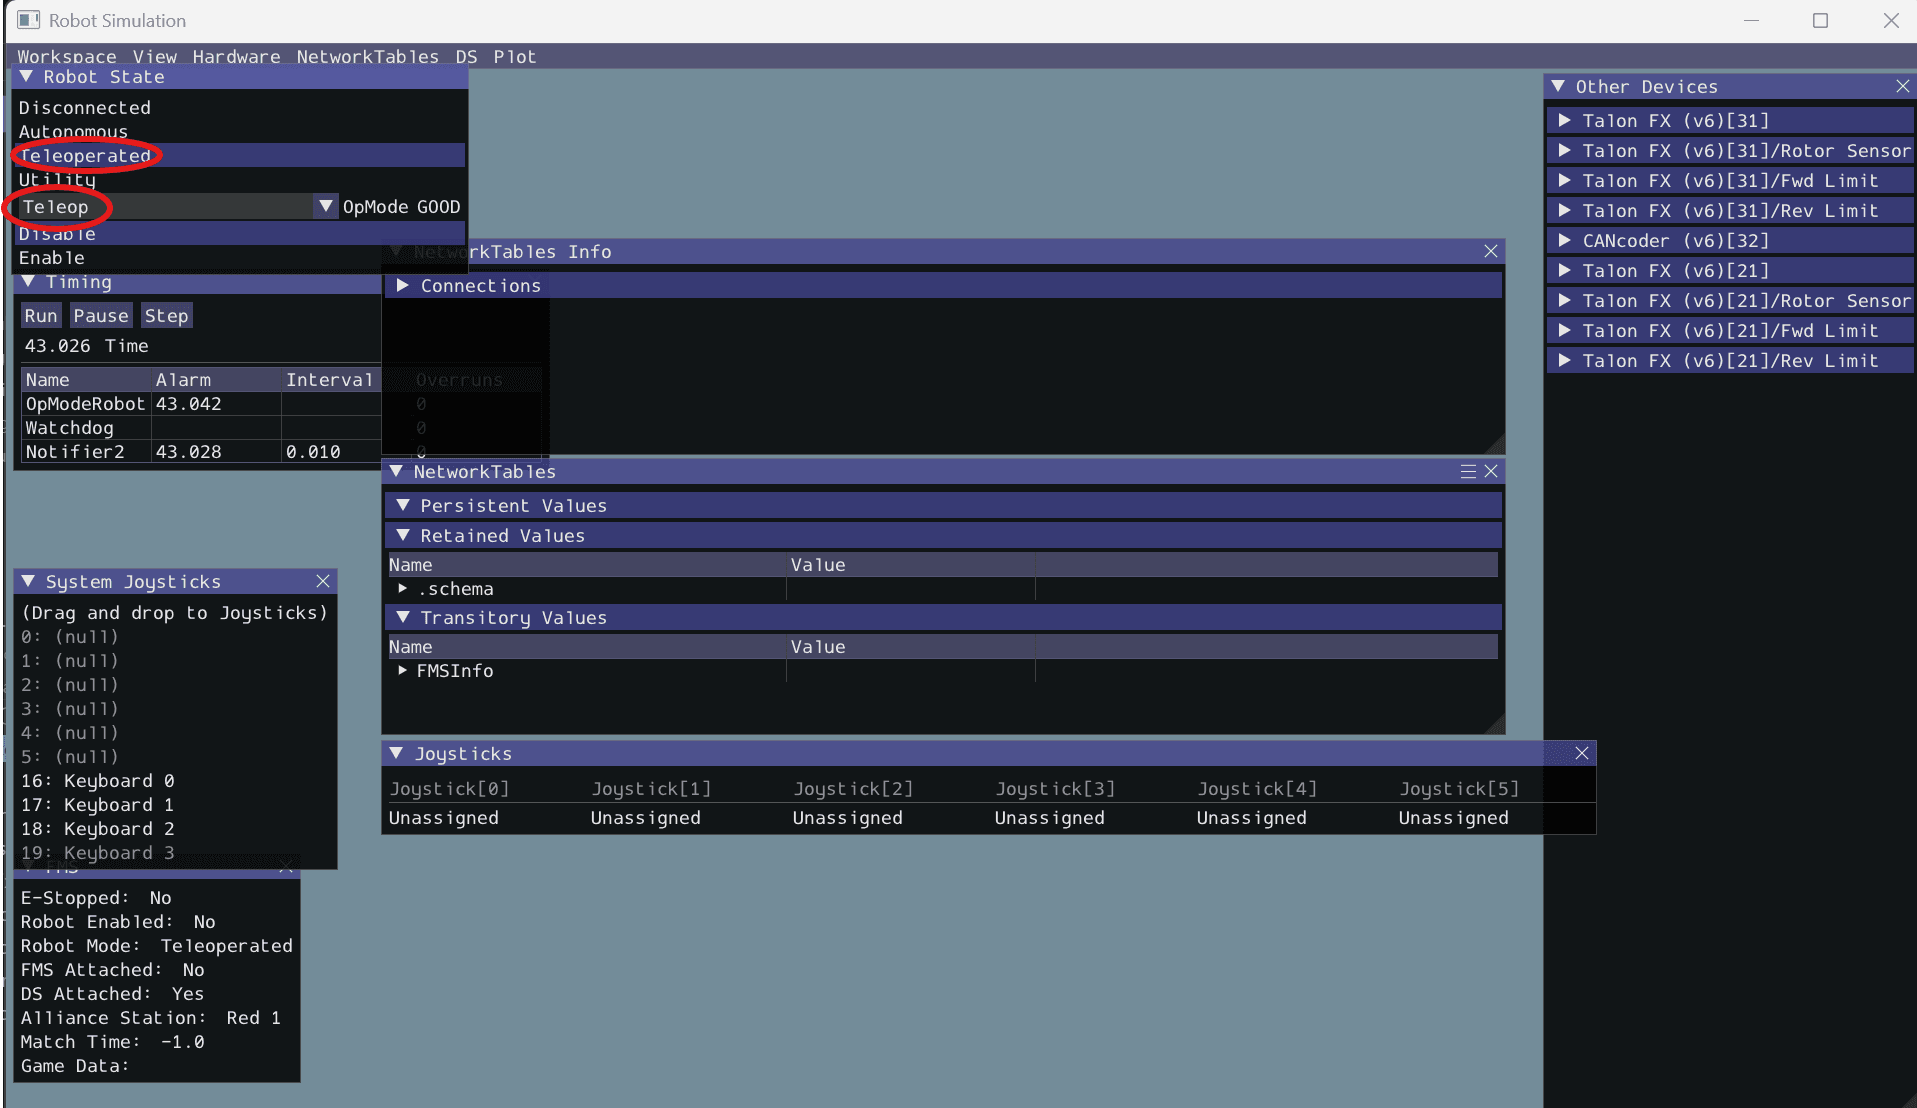
- Click Enable. You should see: nothing move. Every command here hangs off a button, and none is down.
- Now run it. Hold the buttons you bound, whichever ones those turned out to be on your mechanism. You should see: the mechanism move while a button is down, and do whatever that binding's
whileFalsesays when you let go. - Click Disable. Leave the program running for now.
Two things go wrong here more than anything else.
- Teleop is selected and no motor turns. CANivore USB is still on, or the controller is not on port 0, or the driver station still says Disabled. A burst of
CAN message is staleat startup is normal; the same line a few seconds later means the bus is unreachable. - Nothing on the bench moves, and it all looks fine. Check Other Devices in the simulation window. Empty means you started Simulate Robot Code rather than Hardware Sim Robot Code, so the program is driving motors that do not exist. Stop it and start the right one.
The latched request
Every hold here is bound whileTrue with a whileFalse behind it. This step takes the whileFalse away for one run, so you see what it is for. Keep a hand on Disable. Run it only on an arm that turns a full circle. An arm with hard stops drives into one at 6 V.
- Stop the program. In
MyTeleop.java, delete.whileFalse(robot.arm.stop())from the left-trigger line..whileFalse(robot.flywheel.stop())from thea()line. - Start Hardware Sim Robot Code again, pick Teleoperated and your OpMode, and enable.
- Hold the button for a second, then let go. You should see: the armflywheel carry on at 6 V after the release. Click Disable.
- Put the
whileFalseback, and run once more to see the release stop it.
Releasing the button did cancel the command. Canceling ends the code that was sending the request, and sends nothing to the motor. The TalonFX keeps applying the last request it received, because requests stay latched. Something has to send a new one, and that is the job of whileFalse(stop()). Disable works because it cuts every output, which is no use as a plan in the middle of a match.
Check your work
Walk your bindings once more. You are done when each one repeats itself.
You should see
- The mechanism moving while a button is held, every time you hold it.
- The same mechanism doing whatever that binding's
whileFalsenames when you let go, every time.
Deploy to a SystemCore
A robot runs the same program, deployed the same way. Connect the laptop to the robot, open the same … menu, and choose Deploy Robot Code instead of the hardware sim entry. You should see: BUILD SUCCESSFUL, and the robot runs your OpModes from the driver station.
The usual failure is a deploy that cannot find the robot. Check the team number in .wpilib/wpilib_preferences.json, and check that the laptop is on the robot's network.
Check yourself
In hardware simulation, what is being simulated and what is real?
What setting must be turned OFF in Tuner X before running your code in hardware simulation?
With the whileFalse deleted, you release the button and the mechanism keeps going at 6 V. Which fix makes the release stop it?